Simple HTML for bloggers
You don't need to be an expert in HTML to be able to run a blog, but it's helpful to know a few bits and bobs to be able to tweak your layout if you'd like to. I'm definitely not an expert and only have a basic understanding of how it all works, so I have to turn to Google as soon as I need to do anything other than make text bold or add a link. Below are a collection of simple codes/modifications that I've found and used over the past few years that will work for Blogger (but might not in other platforms).
Getting started:
There are a couple of ways to add or change HTML and CSS in Blogger. You can either:
Removing borders from images (3)
Images in Blogger tend to be accompanied by a shadow, or border around them. This should get rid of them:
Adjust letter and word spacing (3)
I like to increase the space between letters and words on my blog as I find that it makes my posts easier to read. You can do this by entering the code below, and simply change the number before 'px' in order to adjust the spacing to your liking (you can also make letters and words closer together by entering a minus sign before the number).
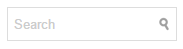
Adding a search box (1)
This will enable visitors to search for key words across your blog. The following code looks like this:
Adding an instagram widget (1)
This can be achieved through websites such as snapwidget, where all of the hard work is done for you. There are a lot of options that you can customise to suit your blog, and once you've finished, all you have to do is copy the code they provide into a HTML/JavaScript gadget where you'd like it to go.
Uppercase gadget titles (3)
To make your gadget titles look like this:

Other layout tips
There are a few other adjustments you can make to your blog's layout which don't require you to change any coding yourself. They might be helpful to those of you who are new to blogging, or those who are like me and didn't realise that these things could be changed until recently!
Removing the navbar
Blogger has a navigation bar that comes with default layouts, which looks like this:

It can be quite useful as it enables you to flag blogs and jump to a blog that has been recently updated, but it doesn't often fit in well with themes that are aiming to look a bit more professional. To remove it, go to your layout and click 'edit' under the navbar gadget in the top right hand corner, then simply turn it off!
Turning off autoenhance
Blogger has an image editing feature, called autoenhance, which automatically edits any image you upload. I found that it made my images appear dull, and any lighter areas became grey. If you're having a similar problem, here's how you can turn it off:
Getting started:
There are a couple of ways to add or change HTML and CSS in Blogger. You can either:
- Add a HTML/JavaScript 'gadget' from the layout section
- Go to template > edit HTML
- Or, template > customise > advanced > add CSS
I'll let you know how to add the particular code mentioned below by adding a (1), (2), or (3) for each one.
Removing borders from images (3)
Images in Blogger tend to be accompanied by a shadow, or border around them. This should get rid of them:
Adjust letter and word spacing (3)
I like to increase the space between letters and words on my blog as I find that it makes my posts easier to read. You can do this by entering the code below, and simply change the number before 'px' in order to adjust the spacing to your liking (you can also make letters and words closer together by entering a minus sign before the number).
Adding a search box (1)
This will enable visitors to search for key words across your blog. The following code looks like this:
Adding an instagram widget (1)
This can be achieved through websites such as snapwidget, where all of the hard work is done for you. There are a lot of options that you can customise to suit your blog, and once you've finished, all you have to do is copy the code they provide into a HTML/JavaScript gadget where you'd like it to go.
Uppercase gadget titles (3)
To make your gadget titles look like this:
Other layout tips
There are a few other adjustments you can make to your blog's layout which don't require you to change any coding yourself. They might be helpful to those of you who are new to blogging, or those who are like me and didn't realise that these things could be changed until recently!
Removing the navbar
Blogger has a navigation bar that comes with default layouts, which looks like this:
It can be quite useful as it enables you to flag blogs and jump to a blog that has been recently updated, but it doesn't often fit in well with themes that are aiming to look a bit more professional. To remove it, go to your layout and click 'edit' under the navbar gadget in the top right hand corner, then simply turn it off!
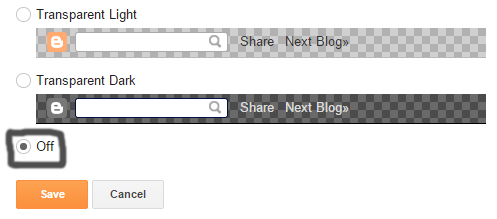
Turning off autoenhance
Blogger has an image editing feature, called autoenhance, which automatically edits any image you upload. I found that it made my images appear dull, and any lighter areas became grey. If you're having a similar problem, here's how you can turn it off:
- On Blogger, hover over your profile picture in the top right hand corner and select 'view profile' (alternatively just go straight to your Google+ account)
- Hover over 'profile', in the top left hand corner below the Google+ logo, and select 'settings'
- Scroll down to 'auto enhance', and select 'off'
Comments
Post a Comment